How to set Margins and Paper Size, create Sections and add Page Numbers
by Section in Microsoft Word on a Windows PC
Microsoft Word has a vast array of tools to support any written project, but therein
lies the problem. How do you find the few tools needed to just format your book for
self-publishing?
You already know from reading Publishing Help Notes number 2 that most books are not
printed on 8.5" X 11" paper, so you must convert your work into a popular book size
with appropriate margins and font size?
NOTE:
But before we begin making changes to the format of you book, there is one
important item we must cover. Many word processing users make heavy use of
carriage returns and spaces to format their work into a pleasing display of
separate pages where chapters start on a full page and other items like the
Dedication and Copyright have their own page. The subsequent changing of margins
and paper size from 8.5 X 11 will destroy all this careful formatting.
If you are guilty of this practice then you need to
replace all those carriage returns and spaces with a single Page Break
at the end of the words on the page preceding the content that is to
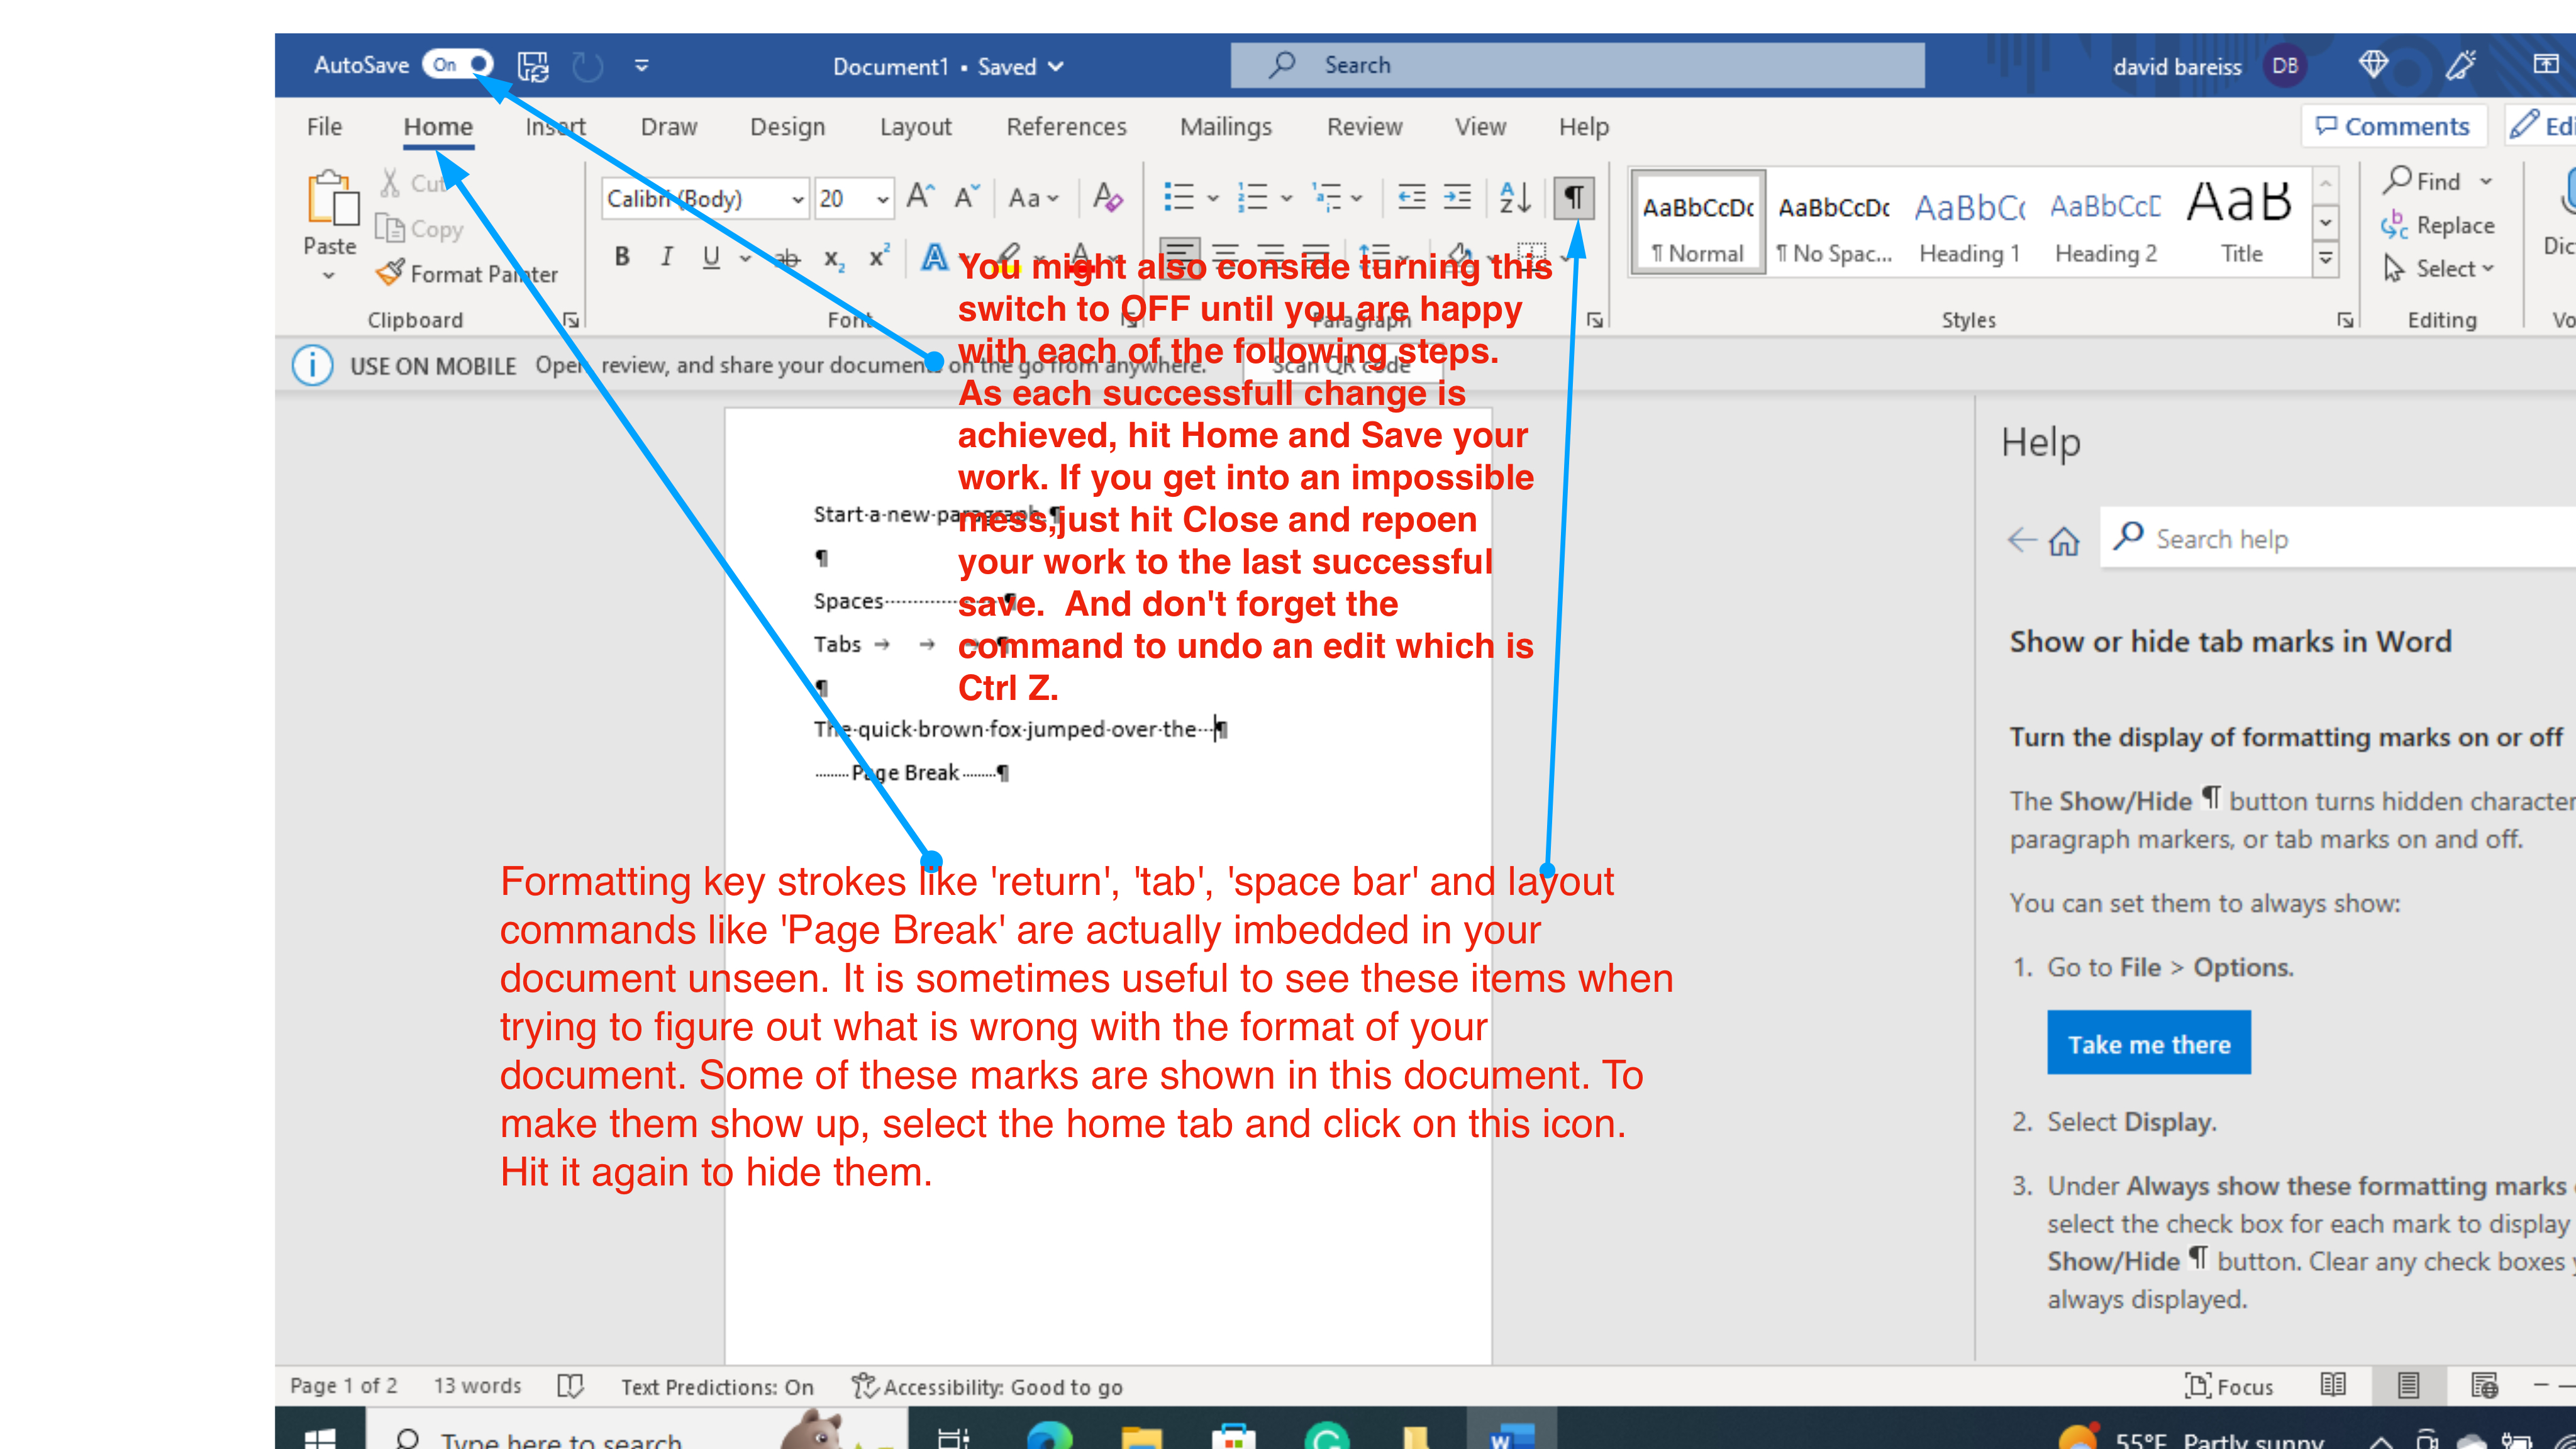
start on next full page. To view those hidden space and carriage return marks,
toggle the switch that will display then.
This screen shows the location of the switch that makes the hidden marks
like carriage returns and spaces
visable. To hide the marks, hit the symbol again.
The following picture shows how to replace excess carriage returns
with one page break.
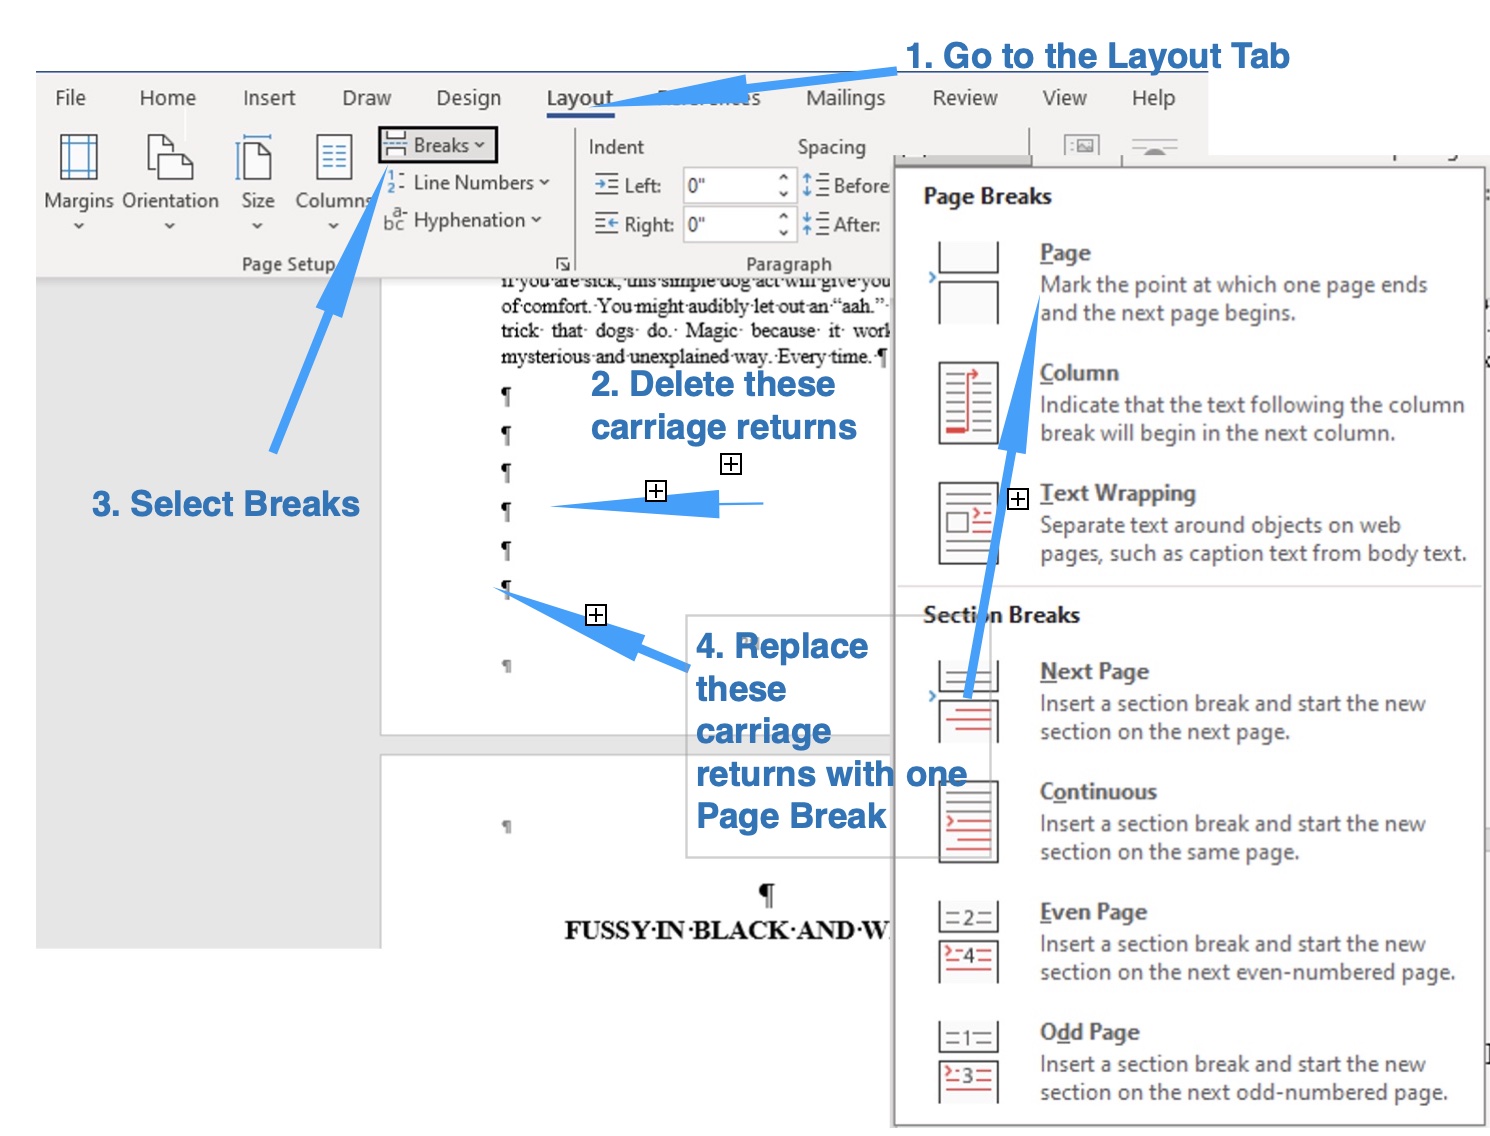
Once you have replaced all the extra carriage returns and spaces with
page breaks where appropriate,
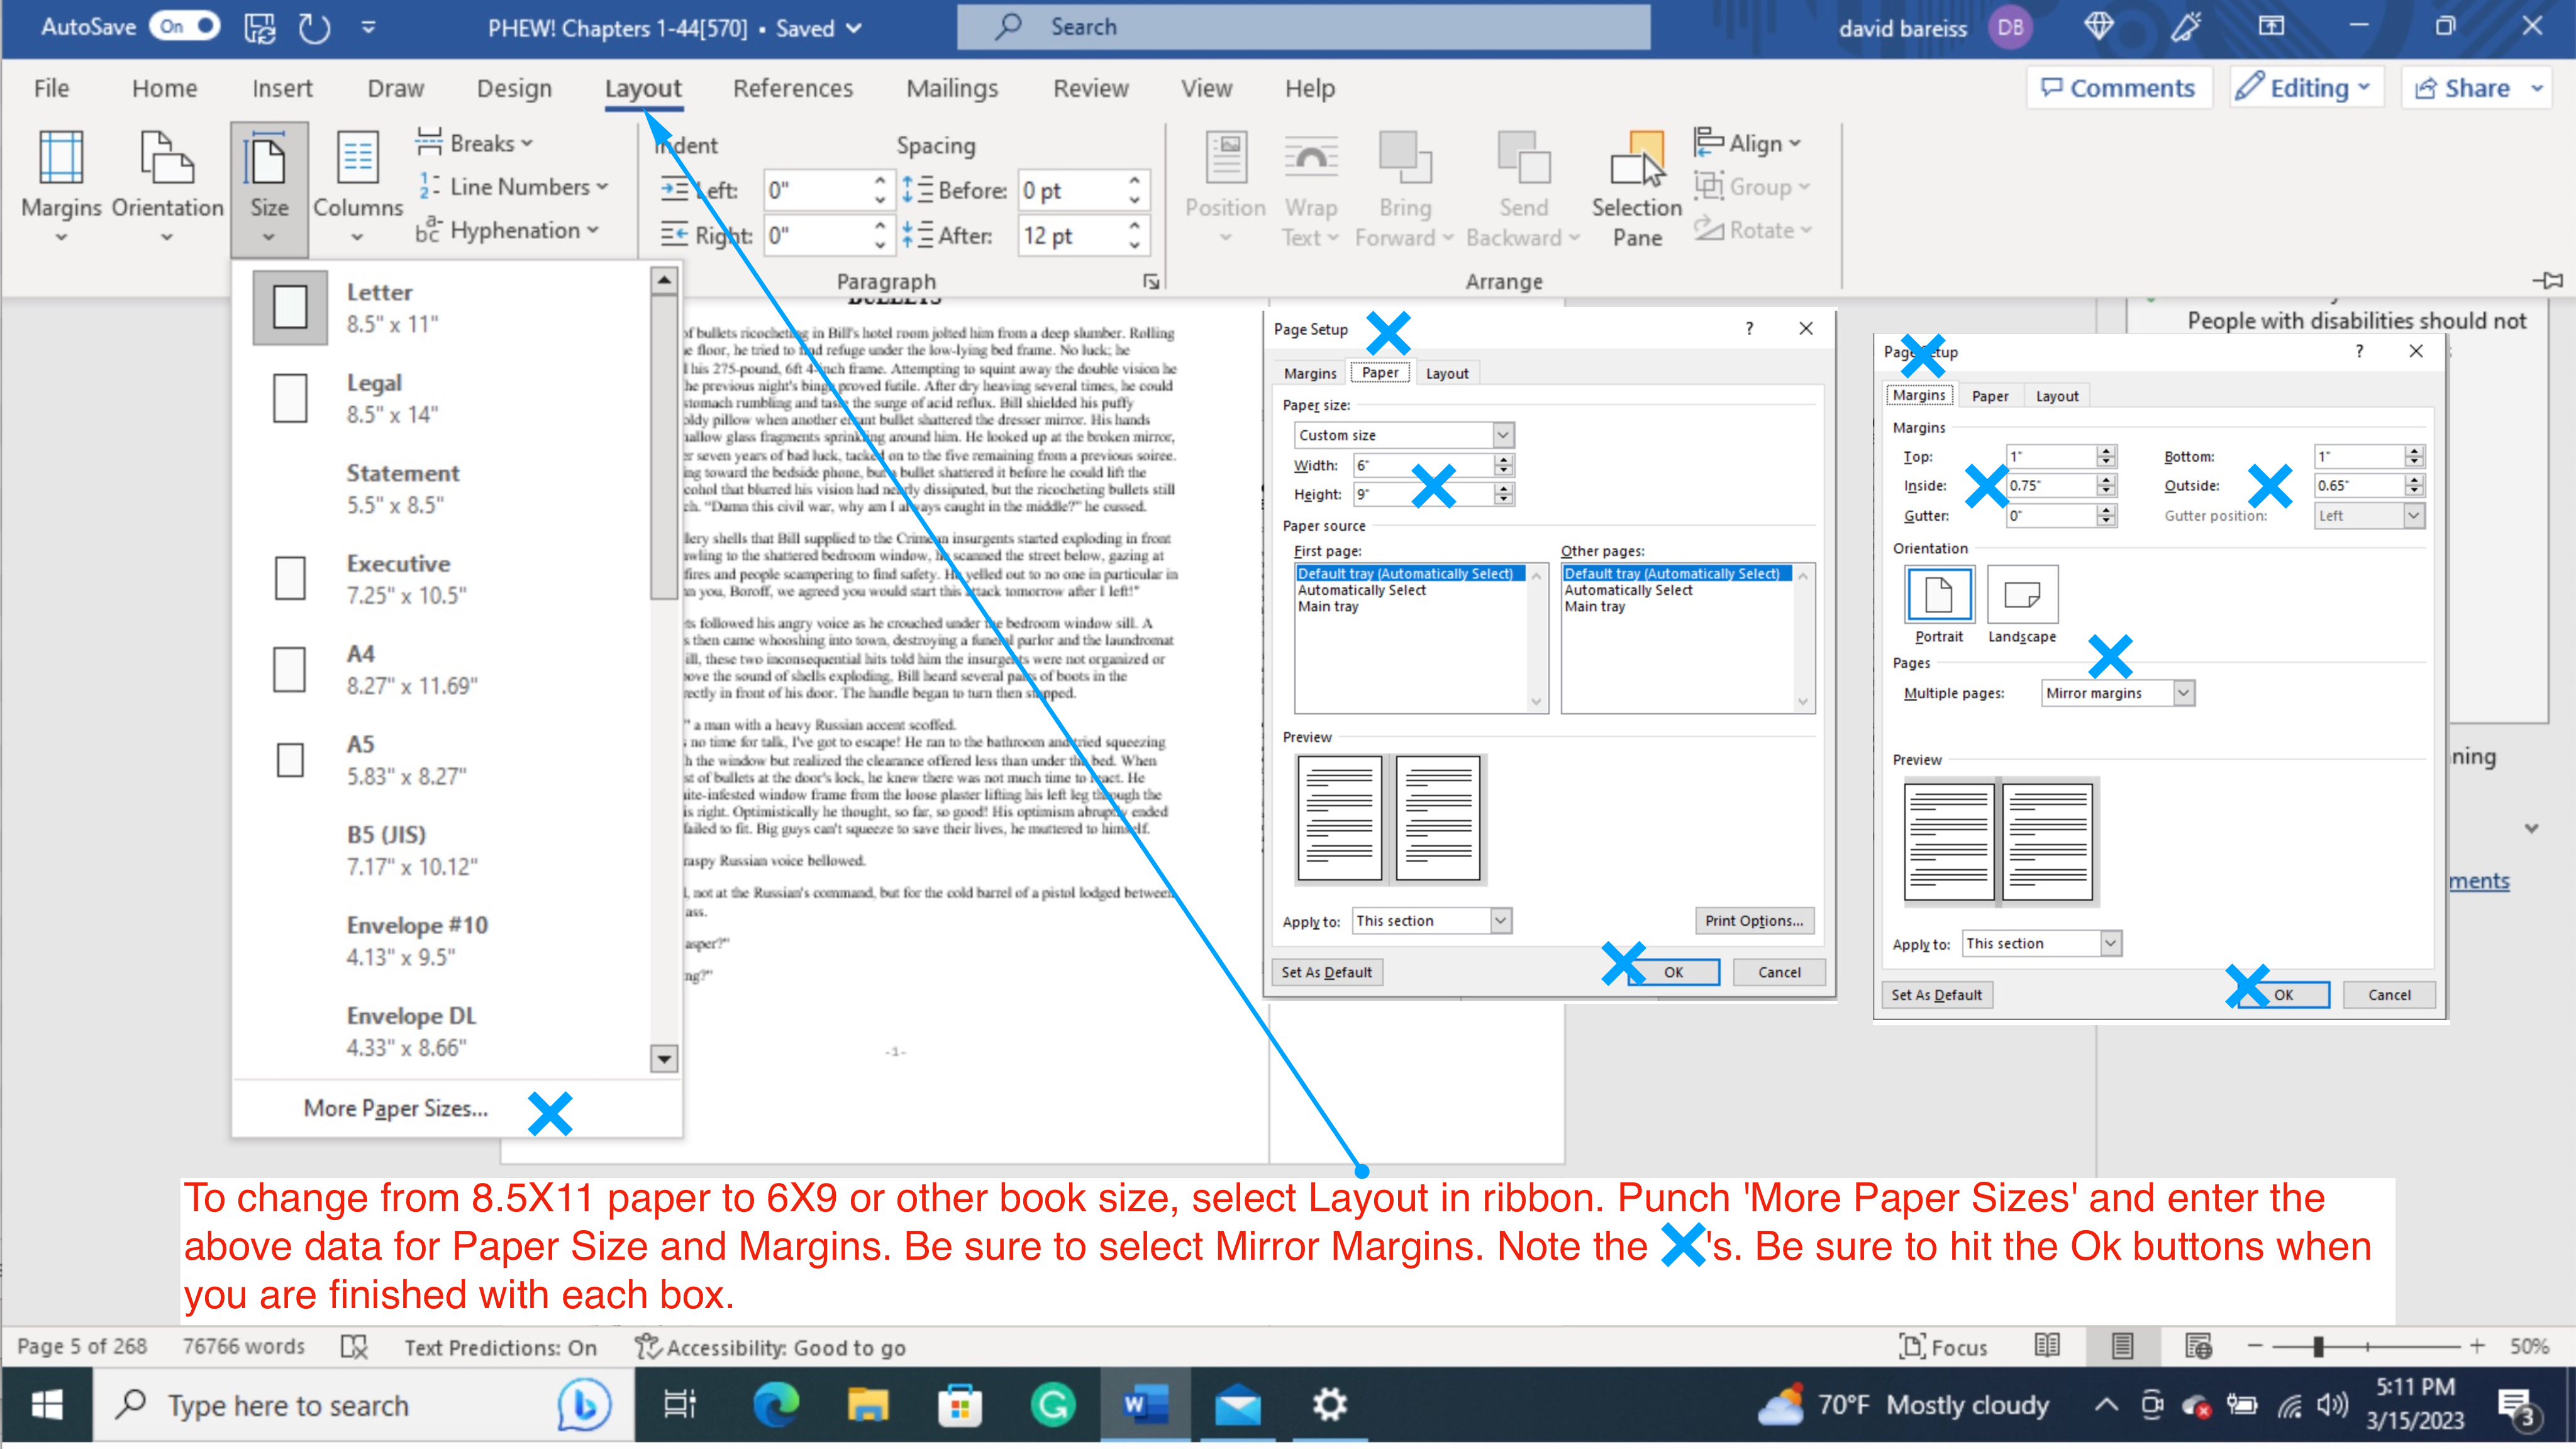
let's begin with the page size and margins, specifically mirror margins. Why mirror
margins? The center of an open book is called the gutter, and anything printed too
far into the gutter is hard to read. Consequently, we want larger margins in the gutter,
which means larger right margins on the left pages and larger left margins on the
right pages This is called mirrored margins.
The following picture shows how to set these paramaters.
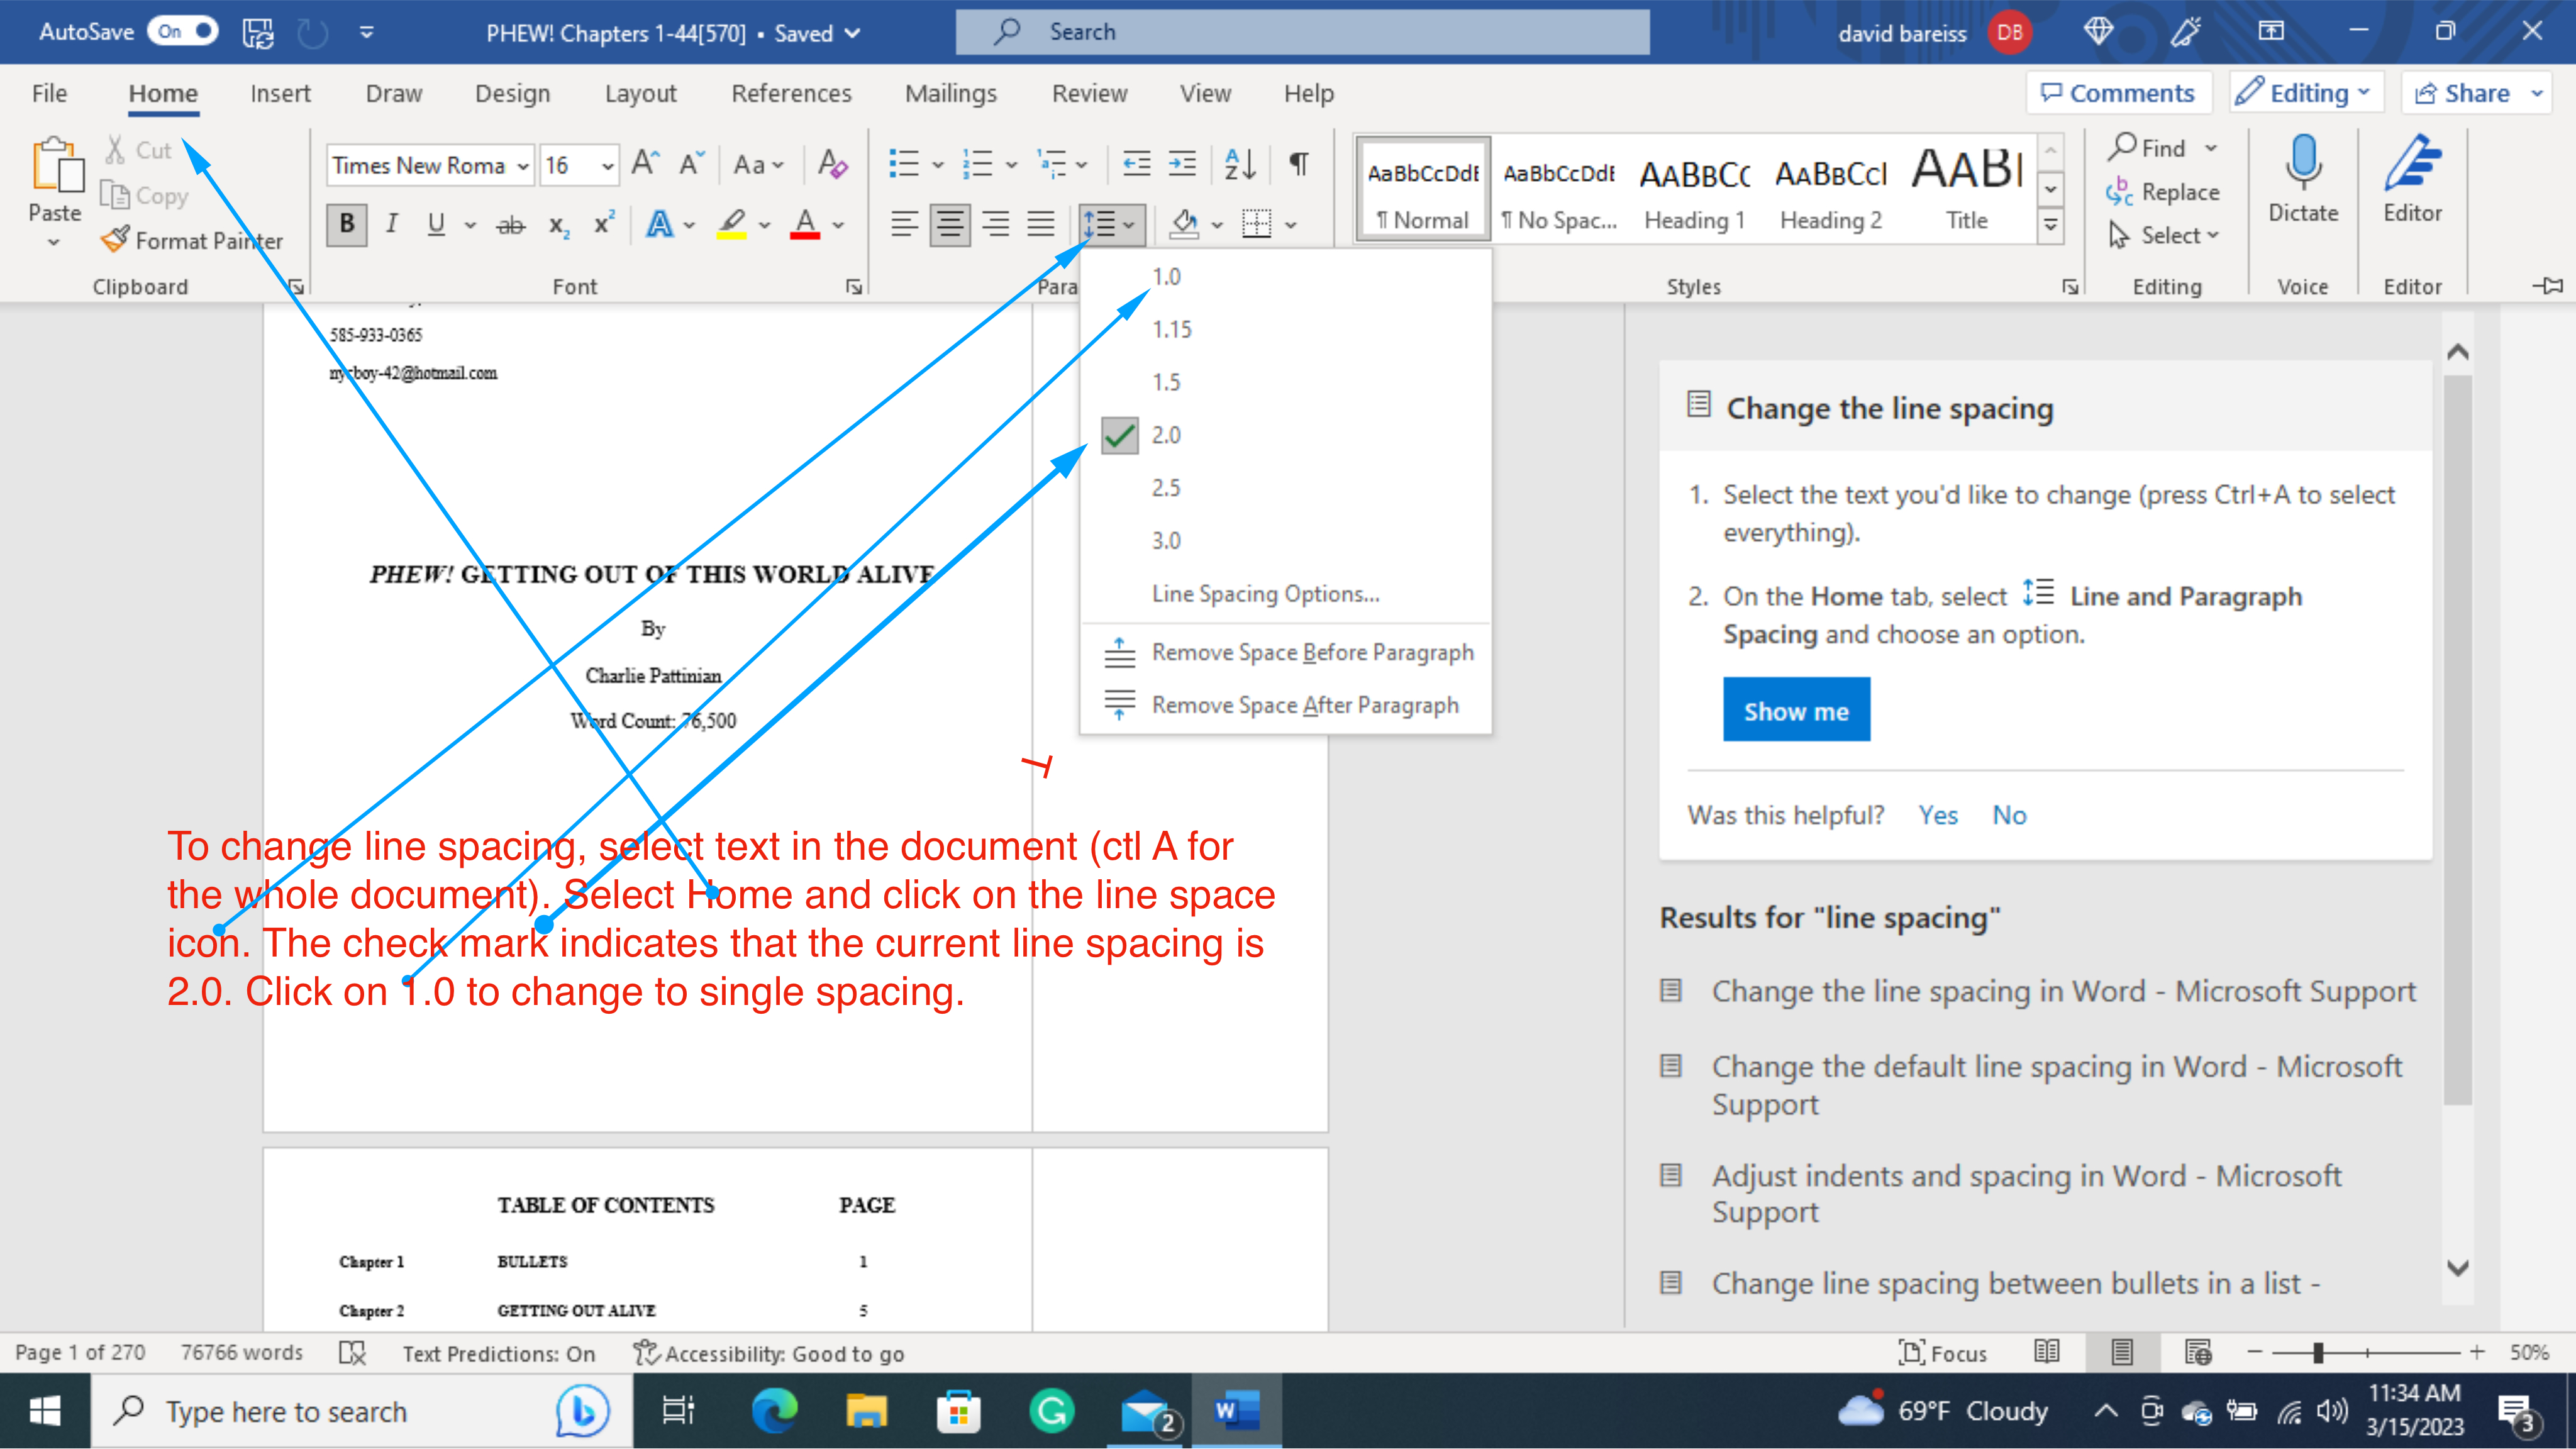
How to set spacing between lines.
If you have written the draft copy of your work in double or other than single
space, the following picture shows how to change the space between lines.
How to set spacing and indents in and between paragraphs
Paragraph spacing on a mechanical typewriter consisted of either hitting two
carriage returns to start a new paragraph or one carriage return followed by
indenting the first line with five spaces. The advent of word processing on a
computer gives the writer many more options.
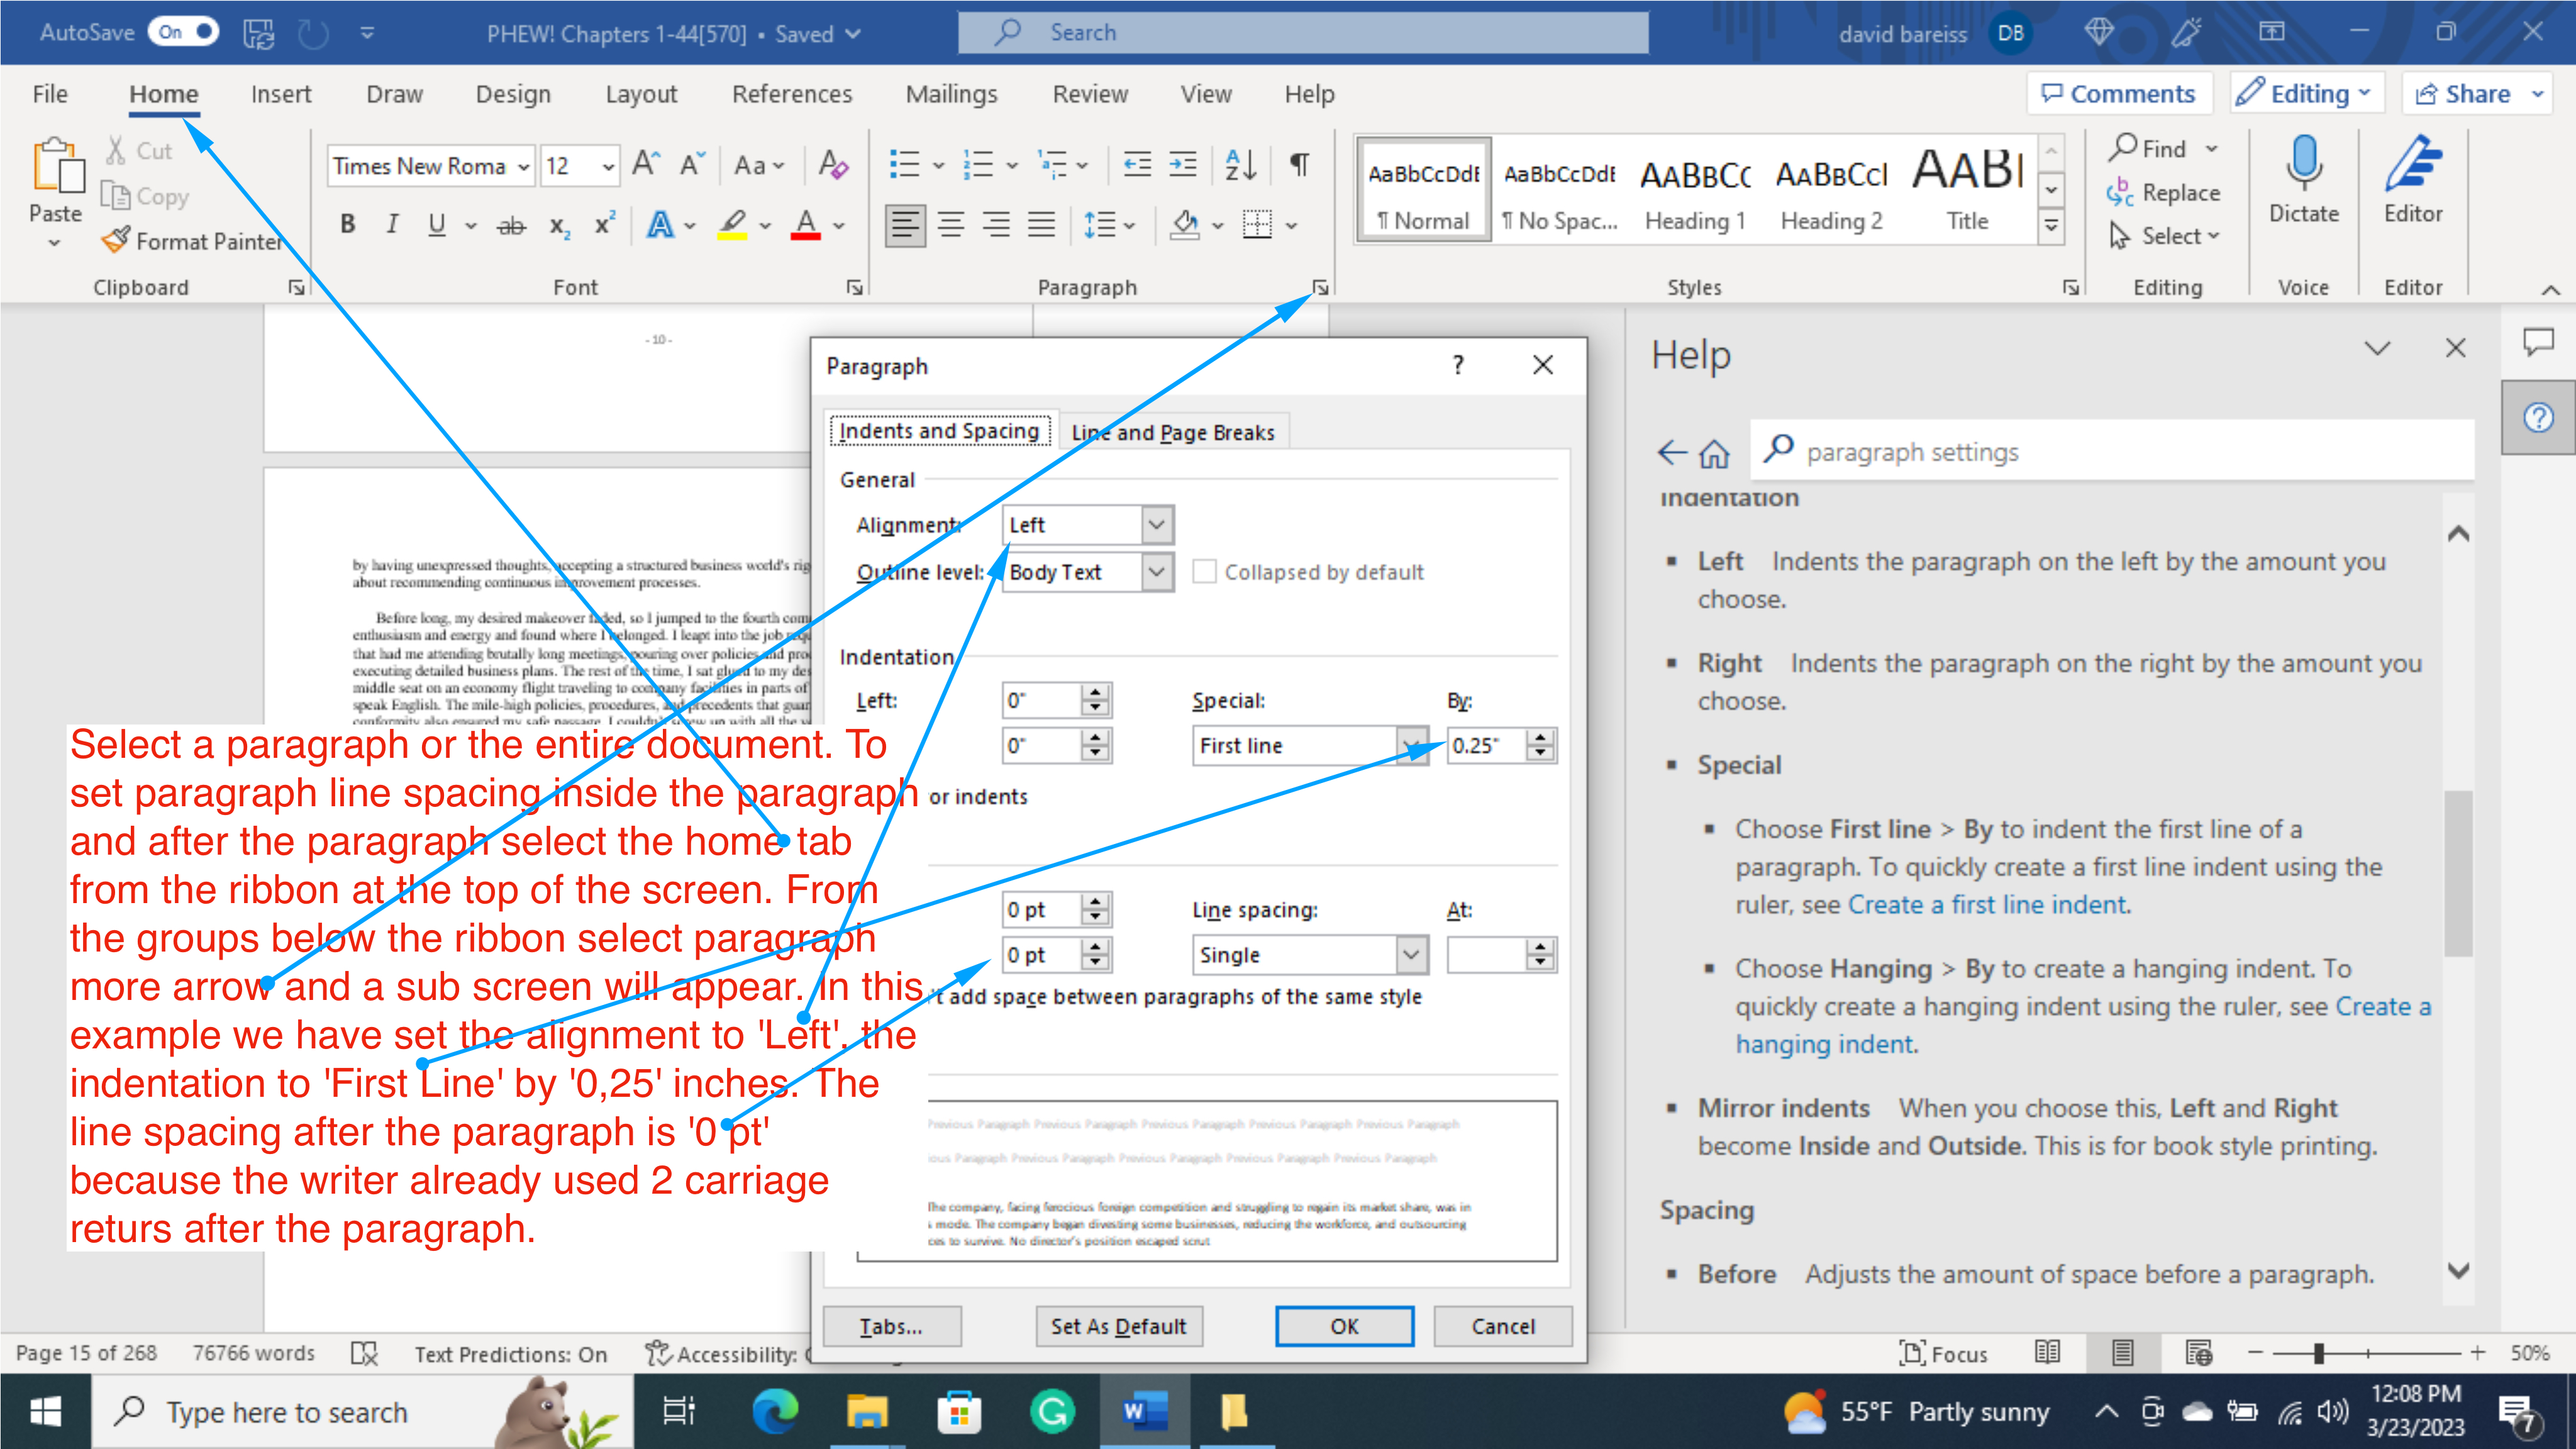
The following picture and explanation is an attempt to explain how to use
Word's paragraph spacing settings to fine-tune the layout of paragraphs
How to create Sections for separate page numbers by Section
Printed books normally have separate sections for title pages, copyright pages,
dedication pages, etc called front matter. The meat of your book is called body
matter, and you may have material like author info and other information at the end of
your book called back matter. Each of these sections may have separate page
numbering formats to differentiate them for the reader. Finding the settings
to apply page numbers in Word can be daunting, and if you have already made a mess
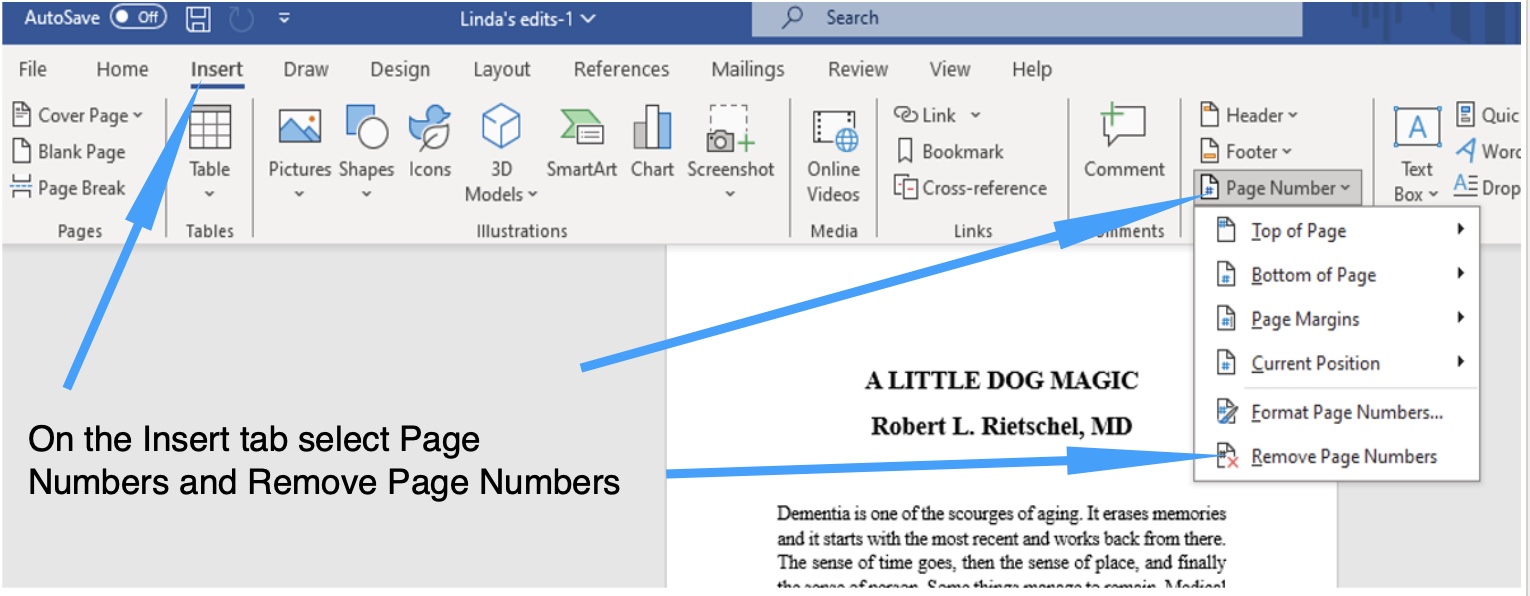
of it, you might consider deleting the existing page numbers and section breaks,
and starting over.
This screen shows how to delete page numbers.
To assist in inserting Section Breaks in your document, toggle on the switch
that will display marks and other formatting sysbols.
This screen shows the location of the switch. To hide the marks, hit the
symbol again.

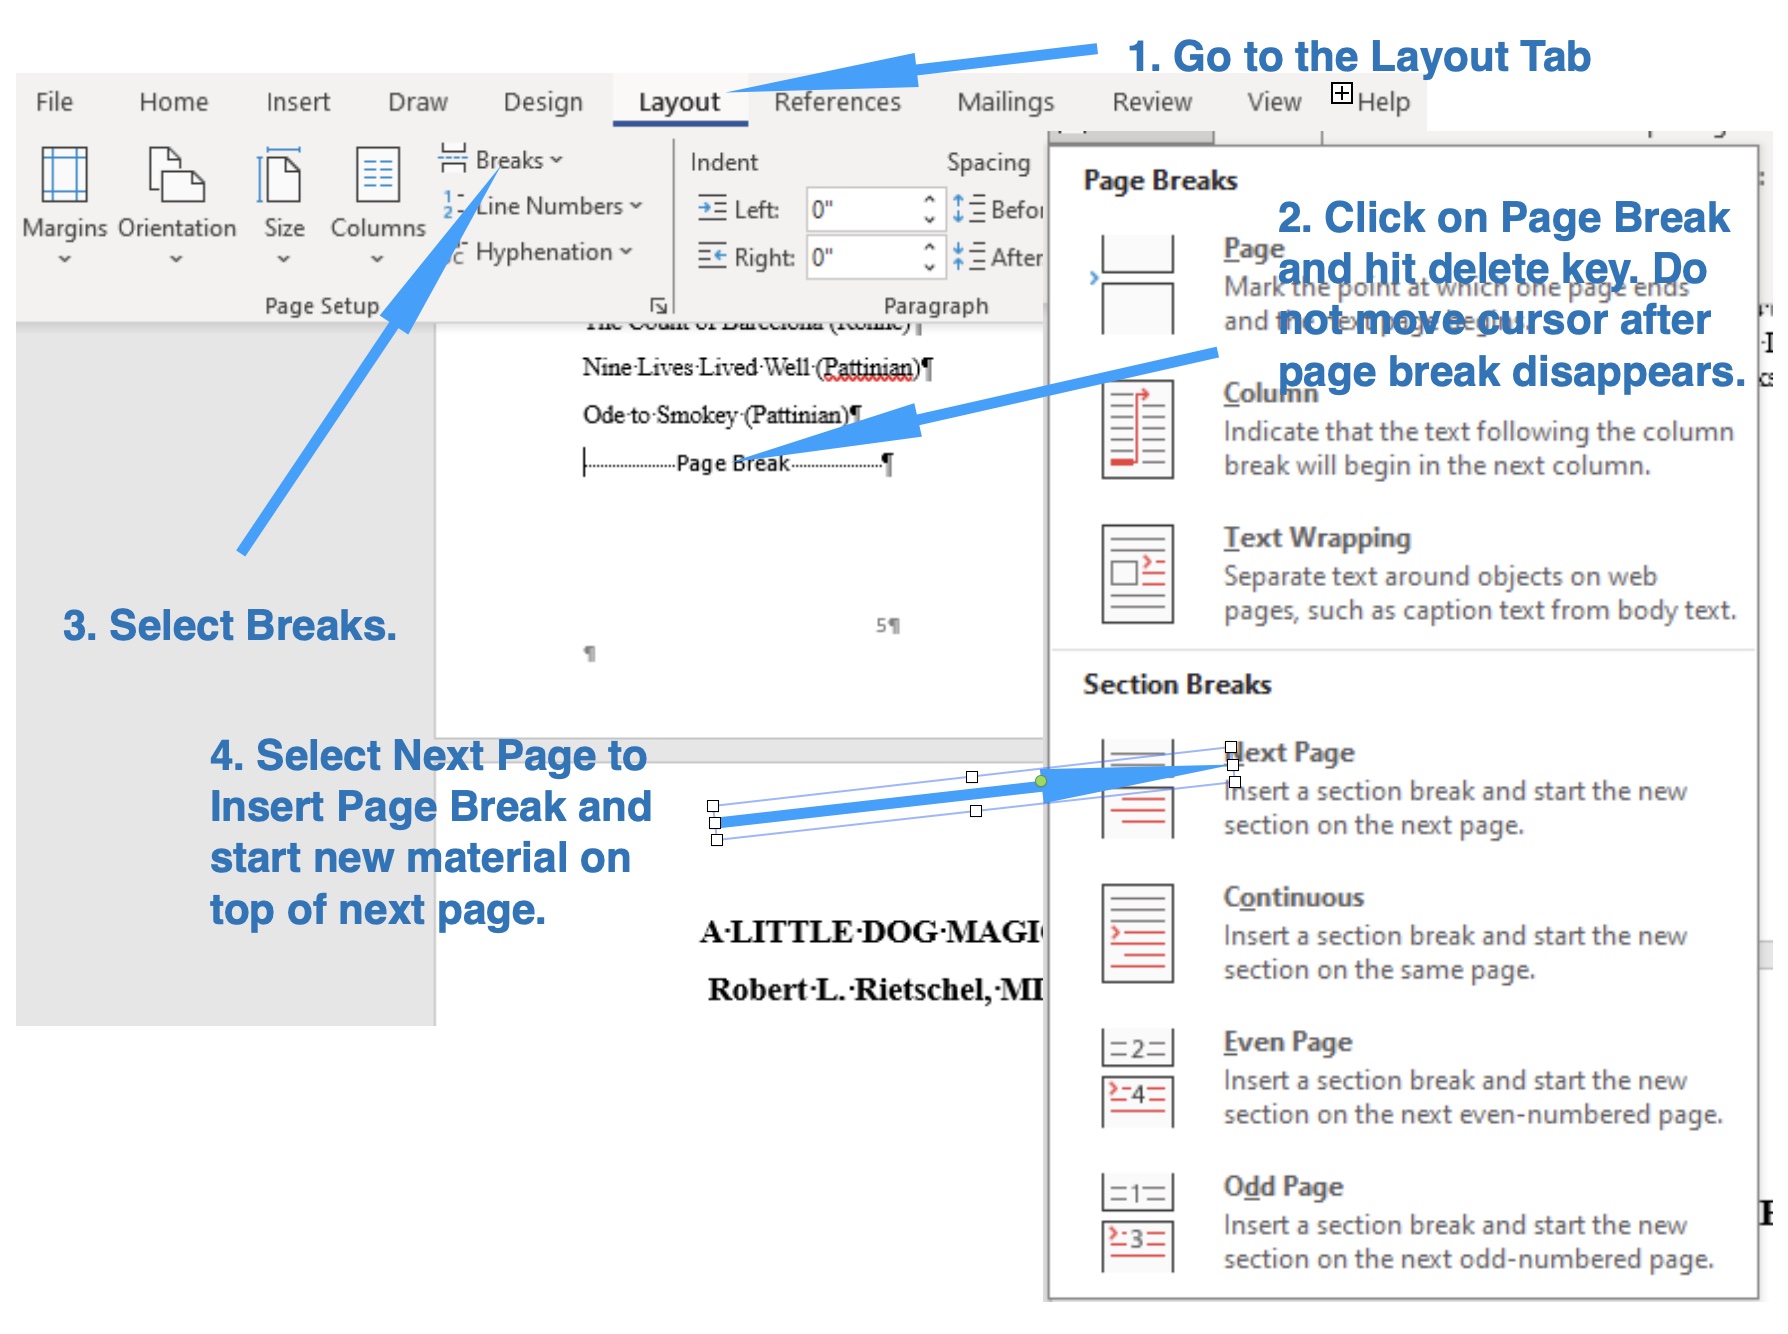
Section Breaks are similar to Page Breaks in that material following
the break with begin on the top of the next page, but the material
on the following pages may be assigned different characteristics
like page number format. The following image shows how to replace
a Page Break with a Section Break.
Now that you have divided your book into separate sections, you may apply page
numbers in different formats. Roman Numerals are popular for numbering pages
in the Front Matter section i.e. i, ii, iii, iv. In the following example
Arabic Numerals are used in the Body Section, and Roman Numerals in the Front
Section.
NOTE:
Page numbers are normally placed in the page Header or Footer, and the
default setting in Word is that all Sections use the same format.
Consequently, to have different formats you must change that setting before
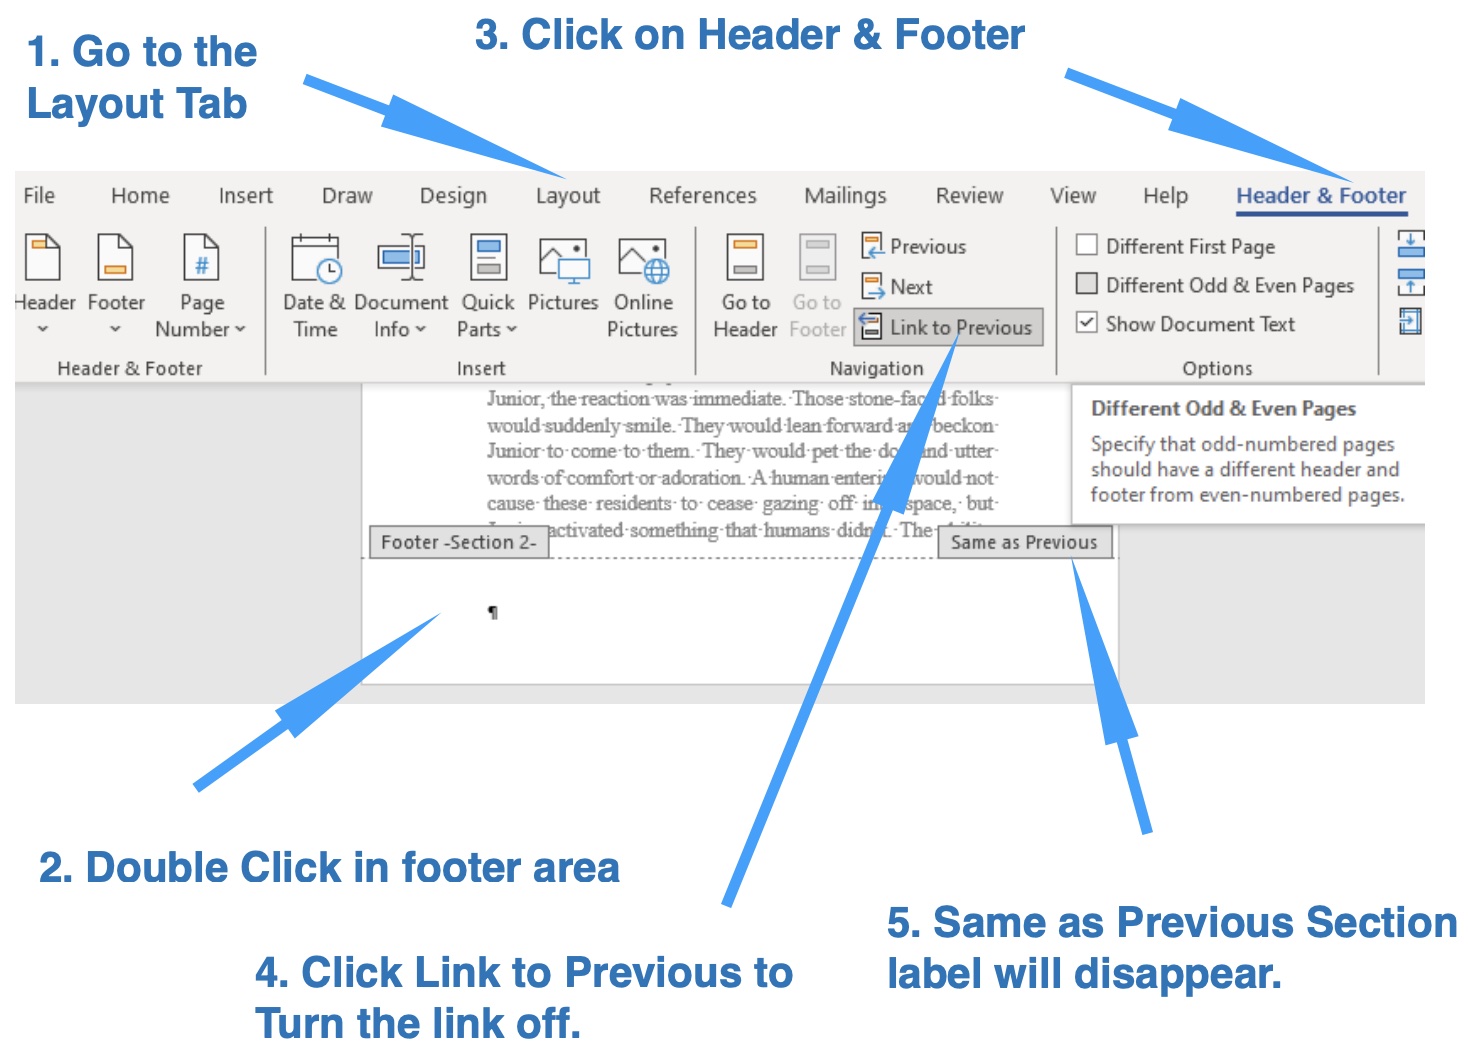
adding page numbers. Use the following commands to begin unlinking the format
of the Page Numbers in the Section 2 Footer. Go to the first page of
your Section 2 and double click in the footer area. The following
image will display.
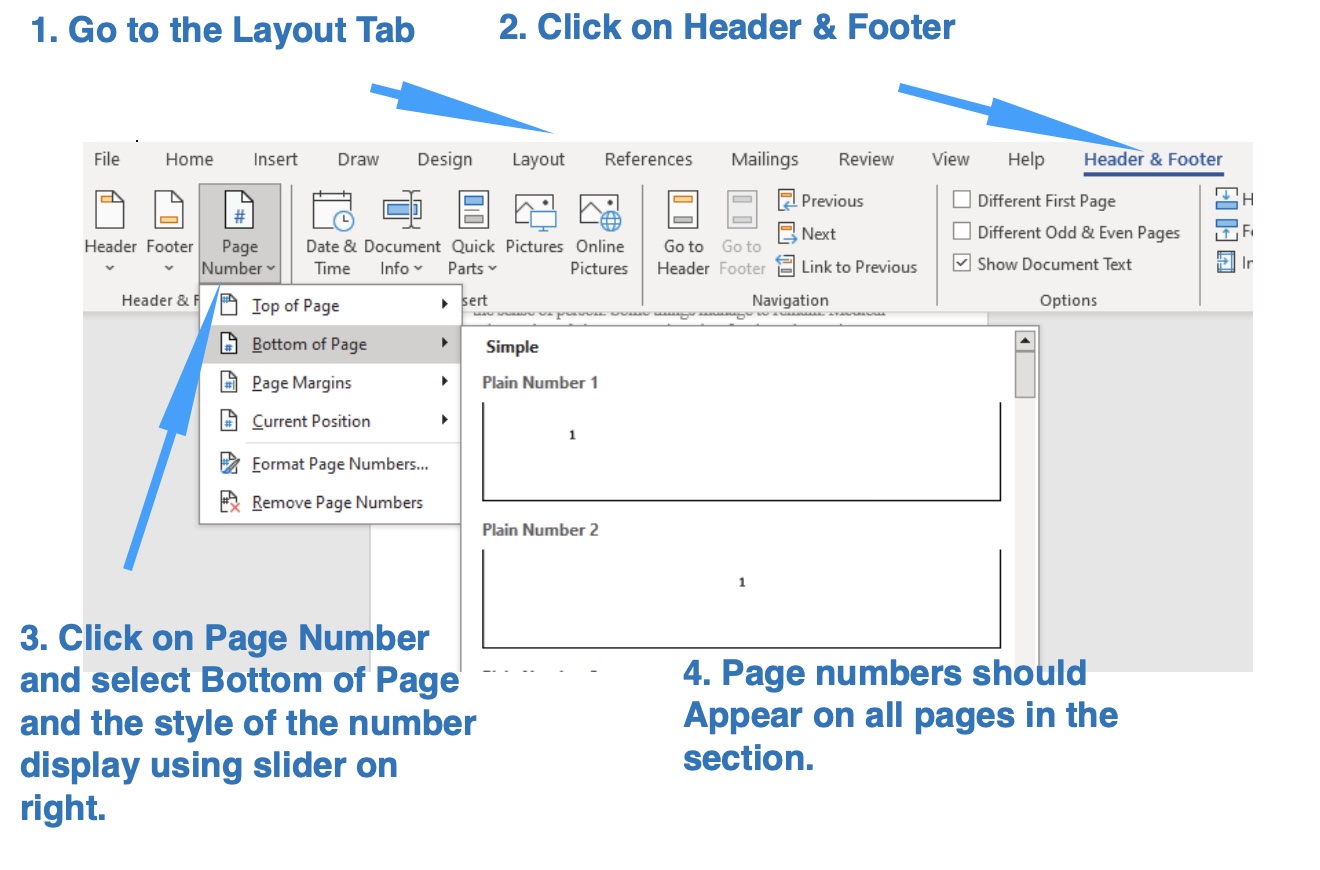
You may now procede to the next step adding the page numbers to a section
using the steps shown below. This step is shown again using the Layout
Tab, but page numbers can also be added using the Insert Tab.
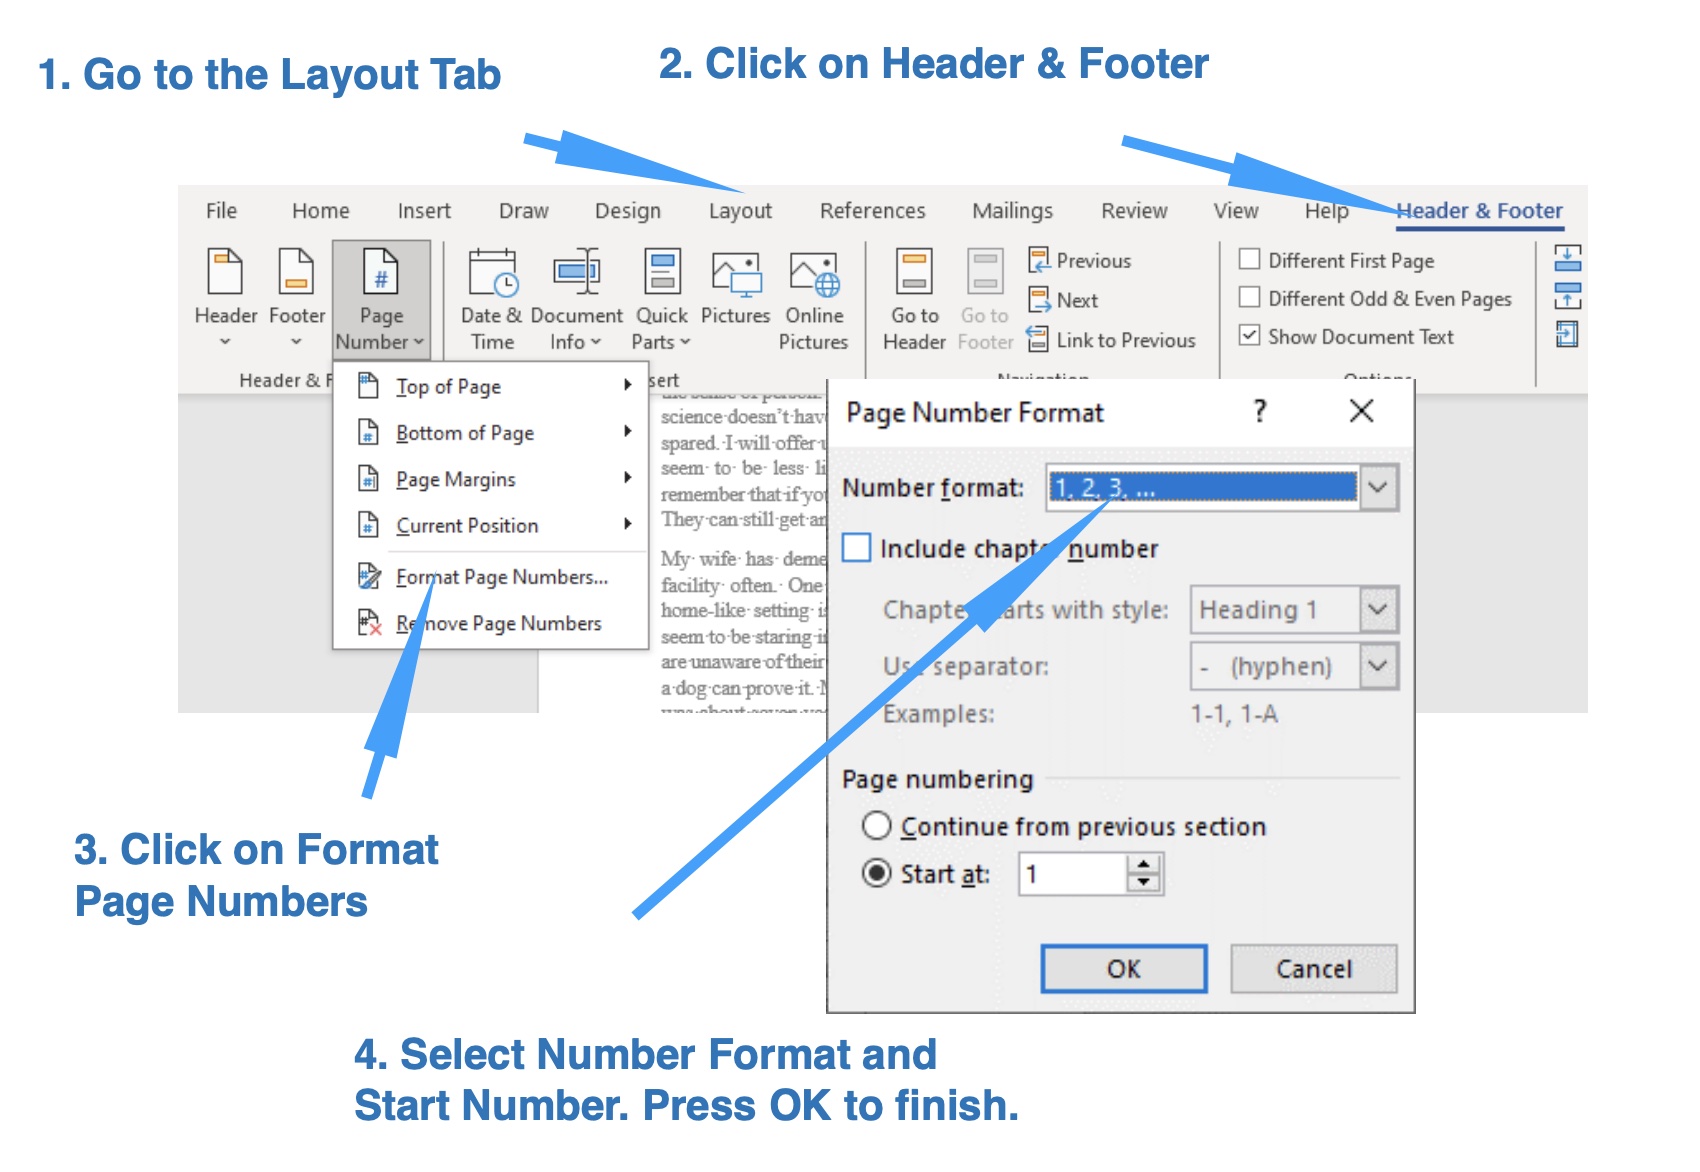
While on the Layout Tab select the Number Format style button and the Page
Number Format selection box will appear. Select format and starting page
number. Hit OK to finish..
